顯示具有 Cisco 標籤的文章。 顯示所有文章

2019/04/19

如何在 macOS 10.14 中使用 telnet 等工具?

最近在 macOS 上玩一些 Cisco Labs 及類似 EVE-NG 的模擬器,當想登入 Router 或 Switch 界面時,便會出現下面訊息:

[Command not found: telnet]
Could not create a new process and open a pseudo-tty.

原來 macOS 10.14 Mojava 移除了 ftp、telnet...等比較老舊不安全的指令,想說手動用 Homebrew 裝回去總可以吧?但還是無法順利執行...心想,總不能因此又裝 windows 回去玩XD 最後終於透過大神找到解決方式,要暫時 disable SIP (System Integrity Protection)。

1.重開機,在出現 apple logo 前一直按住 ⌘ + R 鍵

2.進入回復模式後,找到上方工具程式裡的終端機

2019/04/18

Troubleshoot IPv6 Network Connectivity

11Step 1:

PC1>ping SRV1
Type escape sequence to abort.
Sending 5, 100-byte ICMP Echos to 2001:DB8:0:4::30, timeout is 2 seconds:
.....
Success rate is 0 percent (0/5)

2019/04/17

Troubleshoot IPv4 Network Connectivity

9
PC1#telnet 10.10.3.30
Trying 10.10.3.30 ...
% Destination unreachable; gateway or host down

PC1#ping 10.10.3.30
Type escape sequence to abort.
Sending 5, 100-byte ICMP Echos to 10.10.3.30, timeout is 2 seconds:
U.U.U
Success rate is 0 percent (0/5)

2019/04/16

Configure and Verify IPv4 Extended Access Lists


8
R1(config)#ip access-list extended Example4
R1(config-ext-nacl)#deny udp ?
  A.B.C.D       Source address
  any           Any source host
  host          A single source host
  object-group  Source network object group

R1(config-ext-nacl)#deny udp any ?
  A.B.C.D       Destination address
  any           Any destination host
  eq            Match only packets on a given port number
  gt            Match only packets with a greater port number
  host          A single destination host
  lt            Match only packets with a lower port number
  neq           Match only packets not on a given port number
  object-group  Destination network object group
  range         Match only packets in the range of port numbers

2019/04/15

Understanding HSRP

HSRP 1個虛擬 ip 只能有1個虛擬 mac addr,所以一個 Group 它只能達到備援的功能,若要負載平衡(分流)就必須設定多個 Group。

Troubleshoot HSRP

6
R1:
interface Ethernet0/0
 ip address 10.10.1.2 255.255.255.0
 standby 1 ip 10.10.1.1
!
interface Ethernet0/1
 ip address 10.1.1.2 255.255.255.252

[CCNA Note]StaticNAT/PAT/RIP/Aoto-Summary


[CCNA Notes] Configuring extended ACLs

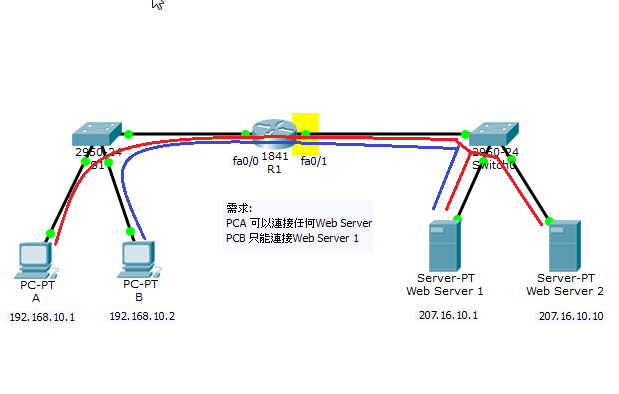
此 lab 一定要用 extended 模式,因為 standard 只能限制來源 PCB 過或不過,不能限制只讓它連Srv1


延伸ACL的介面要盡可能靠近拒絕流量的來源,如此才能在不需要的流量流經網路之前將其過濾掉。
To be more precise when matching a certain network traffic, extended access lists are used. With extended access lists, you can match more information, such as:

  • source and destination IP address
  • type of TCP/IP protocol (TCP, UDP, IP…)
  • source and destination port numbers
  • service (Telnet、WWW、ftp...)
Two steps are required to configure extended access lists:
1. configure extended access lists using the following command:
(config) access list NUMBER permit|deny IP_PROTOCOL SOURCE_ADDRESS WILDCARD_MASK [PROTOCOL_INFORMATION] DESTINATION_ADDRESS WILDCARD_MASK PROTOCOL_INFORMATION

[CCNA Notes] Configuring standard ACLs

To create an standard access list on a Cisco router, the following command is used from the router’s global configuration mode:
R1(config)# access-list ACL_NUMBER permit|deny IP_ADDRESS WILDCARD_MASK
NOTE
ACL number for the standard ACLs has to be between 1–99 and 1300–1999.
                               extended ACLs has to be between 100–199 and 2000–2699.
 You can also use the host keyword to specify the host you want to permit or deny:
R1(config)# access-list ACL_NUMBER permit|deny host IP_ADDRESS
Once the access list is created, it needs to be applied to an interface. You do that by using the ip access-group ACL_NUMBER in|out interface subcommand. in and out keywords specify in which direction you are activating the ACL. in means that ACL is applied to the traffic coming into the interface, while the outkeyword means that the ACL is applied to the traffic leaving the interface.
* IPv6 不支援 standard ACLs

R1(config)#access-list ?
<1-99> IP standard access list
<100-199> IP extended access list
R1(config)#access-list 10 permit ?
A.B.C.D Address to match
any Any source host
host A single host address
R1(config)#access-list 10 permit 192.168.10.1
R1#sh access-lists
Standard IP access list 10
10 permit host 192.168.10.1

2019/04/09

Building Redundant Switched Topologies

2Step 1 Ensure that all VLANs exist on the switches.Also,make sure that the ports have been configured in correct VLANs based on the topology diagram.

Step2 將 SW2 調整成為 vlan 10,11,20,22 的 Route Bridge,SW2 若掛掉由 SW1 取代,SW3 為 vlan 30 的 Route Bridge。

Step3 Enable PortFast and BPDU guard on the access ports on the three switches.

SW1#sh vlan
VLAN Name                             Status    Ports
---- -------------------------------- --------- --------------------
1    default                                  active    Et0/1, Et0/2, Et0/3, Et1/3
10   VLAN0010                         active    Et0/0
11   VLAN0011                         active    Et0/0
20   VLAN0020                         active
33   VLAN0033                         active   .....>設錯,少了22、30,多33
...

Configure Root Bridge and Analyze STP Topology


2p64.  Step 1~ step 8
SW1#sh spanning-tree vlan 20
VLAN0020
  Spanning tree enabled protocol ieee
  Root ID    Priority    32788
             Address     aabb.cc00.0100
             This bridge is the root (因為 SW1 MAC Addr 最小)
             Hello Time   2 sec  Max Age 20 sec  Forward Delay 15 sec

  Bridge ID  Priority    32788  (priority 32768 sys-id-ext 20)
             Address     aabb.cc00.0100
             Hello Time   2 sec  Max Age 20 sec  Forward Delay 15 sec
             Aging Time  300 sec
Interface           Role Sts Cost      Prio.Nbr Type
------------------- ---- --- --------- -------- --------------------------------
Et0/1               Desg FWD 100       128.2    Shr
Et0/2               Desg FWD 100       128.3    Shr

2019/04/07

[CCNA Notes 8-3] Routing Between VLANs

不同的 VLAN 間溝通的方法有 :用 Router (1.有多個界面 2.單個界面跟做法)、L3 Switch(最常見的做法)。

1.多個界面:Router with a Separate Interface in Each VLAN

在[8-2]裡我們已經設好這兩台 Switch 及各電腦的 ip ,現在用一台 Router 來做 Routing ,因為有兩個 vlan 我們先用兩條線,不同的 vlan 的電腦請設好各自的 gateway。

SwitchA 的 fa0/23 跟 Router 的 fa0/0 規劃給 vlan 10走,SwitchA 的 fa0/24 與 Router fa0/1 給 vlan 20

Router(config)#int fa0/0
Router(config-if)#ip addr 192.168.10.254 255.255.255.0
Router(config-if)#no sh

2019/04/04

Troubleshooting VLANs and Trunks

1
相關設定可在 STARTUP-CONFIGS 中查到,我們可知 PC3、5、7 同屬於 vlan 11,PC2、4、6 同屬 vlan 22,題目指出目前大家都 ping 不到 SW5,vlan 11的PC3跟PC5不通,請開始 Troubleshooting 吧!
5台 Switch 的資訊:

2019/04/01

[CCNA Notes 8-2] VLAN Connectivity


Switch(config-if)#switchport ?

  access         Set access mode characteristics of the interface
  mode           Set trunking mode of the interface
  native         Set trunking native characteristics when interface is in trunking mode
  nonegotiate    Device will not engage in negotiation protocol on this interface
  port-security  Security related command
  priority       Set appliance 802.1p priority
  trunk          Set trunking characteristics of the interface
  voice          Voice appliance attributes

SwitchA#show vlan

VLAN Name                             Status    Ports
---- -------------------------------- --------- -------------------------------
1    default                                 active    Fa0/1, Fa0/2, Fa0/3, Fa0/4
                                                                 Fa0/5, Fa0/6, Fa0/7, Fa0/8
                                                                 Fa0/9, Fa0/10, Fa0/11, Fa0/12
                                                                 Fa0/13, Fa0/14, Fa0/15, Fa0/16
                                                                 Fa0/17, Fa0/18, Fa0/19, Fa0/20
                                                                 Fa0/21, Fa0/22, Fa0/23, Fa0/24

2019/03/30

[CCNA Notes 8-1] 在 Switch 上設定 Port-Security


公司因為資安問題限制某部門只能用內部的電腦PC0,PC1上網,MIS 必須要知道是否有違規的情形,所以在 Switch 上建立 Port-Security 規則,有人違規即刻切斷網路。

做法1:Static Learning

SiteA_SW01(config)#interface FastEthernet0/1
SiteA_SW01(config-if)#switchport mode access(只有一個Data VLAN可以流通)
SiteA_SW01(config-if)#switchport port-security (啟用)
SiteA_SW01(config-if)#switchport port-security maximum 2(看該部門該有幾台電腦數量)
SiteA_SW01(config-if)#switchport port-security mac-address 0000.1111.1111
SiteA_SW01(config-if)#switchport port-security mac-address 0000.1111.2222
(把 mac-addr 都設上去,若數量多就用 sticky 沾黏的)
SiteA_SW01(config-if)#switchport port-security violation shutdown
(violation有3種模式:
1.Protect 保護:違反擋住,合法通過
2.Restrict 限制:違反擋住,合法通過,但會送出告警
3.Shutdown:違反發生即全部擋住)

SiteA_SW01#sh port-security address

2019/03/03

[CCNA Notes 3] OSI Physical Layer 碰撞(collision)

碰撞(collision)
兩個資料於相同的時間點上使用相同的傳輸通道來傳送,導致彼此的訊號互相干擾,因無法辨識將正確的資料傳輸給對方,均須隨機等待一段時間後再重送,資料封包碰撞愈多,網路的使用效率也隨之變差。

集線器與交換器之不同

Hub 並不會篩檢封包,它只是扮演在A、B區段間轉送封包的功能而已,故所有連接設備同屬一個碰撞領域 。

Switch 會維護一張 MAC Address Table,記錄哪個 MAC address 位於哪一區段的資料,故能分割成兩個獨立的碰撞領域。

但由於 MAC Address Table 在預設的情況下只講信任,並沒有驗證機制,連接著 Switch 的 Host 說自己是什麼 MAC Address,Switch 都會信以為真。所以理論上,Host 端可把虛假的 MAC Address 放進 Frame 裡發給 Switch,讓 Switch 把它放進 MAC Address Table 中,可達到攻擊效果,如何避免以後再談。

[CCNA Notes 1] 常見的 Cisco 網路設備模擬器

What is CCNA?
CCNA (Cisco Certified Network Associate) is a certification from Cisco, the world’s most famous company that manufactures and sells networking equipment. 其考試範圍及內容著重於現今流行的網路技術及思科系統的路由器、交換器等產品的設定、調校及故障排除。

目前比較常見的 Cisco 模擬器有 Boson NetSimGNS3Cisco Packet TracerPearson IT CertificationEVE-NG,以下介紹如何免費取得 Cisco Packet Tarcer 的方法:

1.到思科網路學院註冊帳密:
https://www.netacad.com/courses/packet-tracer/introduction-packet-tracer
成功後去信箱啟用
親愛的 xxx,
歡迎來到 Cisco Networking Academy!   您的 NetAcad ID 是 555xxx55。  如果您已經有密碼,請訪問 www.netacad.com/login 存取您的課程。
若要啟動帳戶,請確認電子郵件地址並選取密碼:
確認電子郵件地址 >>
無論您是否總是對於科技充滿熱情,或剛開始摸索 IT 領域,不管何時起步都不嫌晚。
順頌商祺,
Cisco Networking Academy 團隊

2.下載 Cisco Packet Tracer:
https://www.netacad.com/group/offerings/packet-tracer/
目前有 Windows、Linux及行動裝置版本,就是沒 macOS 啦!所以我就得先裝一個 win 在macbook 裡面。
安裝好登入後就可以開始玩了~

Cisco IOS,跟 Apple 的 iOS 完全無關,指的是 Internetwork Operating System,為思科 Switch及 Router 上的作業系統,CLI 為 Packet Tracer 上的 Command Line Interface,大致上有5種模式:
(1)User Exec Mode(User Mode)
Router>

(2)Privilege Exec Mode(Enable Mode)
Router>en
Router#

(3)Global Configuration Mode(Config Mode)
Router#conf t
Router(config)#

(4)Interface Configuration Mode(Interface Mode)
Router(config)#int fa0/1
Router(config-if)#

(5)Line Mode
Router(config)#line vty 0 4
Router(config-line)#password 456
Router(config-line)#login

Router(config)#line console 0
Router(config-line)#password 123
Router(config-line)#login
PC0用Cross Over線接Router,採 telnet 方式連入,
PC1用console線對接,開 Terminal 方式直接進入。